Recently my notebook has been giving me a lot of trouble. When I run too may applications, or sometimes when I’m watching DivX shows, the CPU will suddenly slow down. I can feel hot air coming out of the exhaust port When I place my hand there.
This is a continuation of a series of posts that document how I cleaned the cooling fan.
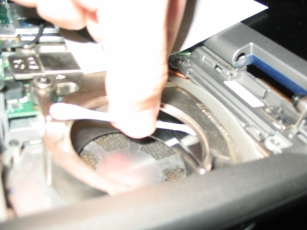
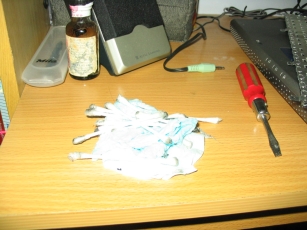
Step 9: Clean the fan with a damp cotton bud, cleaning all the accumulated dust.
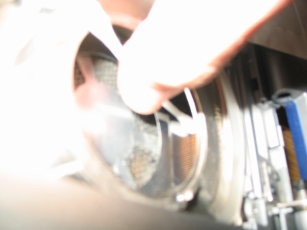
Step 10: Clean the cooling block as well. The layer of accumulated dust actually becomes an insulation layer that prevents heat from dissipating effectively. You have to reach all the way to the back to clean the grill too, since a lot of dust gathers there are blocks the exhaust air flow.
Step 11: This is how a clean grill should look like (I hope!)
Step 12: Make sure the fan housing is dust free as well
Step 13: Look around the rest of the notebook and clean any hair, dust or food crumbs.
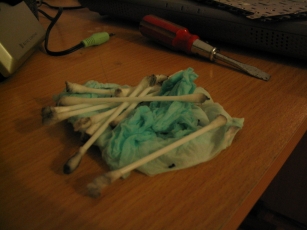
Step 14: Eww, look at all the dust!
Step 15: Put everything back, by reversing steps 8 to 2.
Done! Turn on your notebook to make sure it still works. Your notebook will run at a lower temperature now.
Links to:Technorati Tags: Dell Inspiron 5100

May 6, 2007 at 05:12
Thank you so much for taking pictures for this walk through. It helped me out thanks!
May 6, 2007 at 09:49
No problem Deedra, feel free to drop by if you have any other problems. Always glad to help!
July 6, 2007 at 21:40
Wow! Thank you so much! That was exactly the information I needed in a very well defined and documented format. I bought a Dell 5100 new three years ago and it was trouble free until last month when after about 20 minutes (depending on what it was doing) it would get hot and (instantly) shut-down. I took the back apart – that didn’t help and put it back together. Now that I know where the fan is, and how to get to it I’m sure the problem can be solved. My only other complaint with the system is the video card won’t run some newer games, but I’ll save that for another time.
Thanks again!
Brent.
Adino: So glad I was able to help you Brent.
Adino: You’re welcome, Brent. Glad to help I’ve given up on playing newer games now. Mostly playing those mini-games that don’t need a new video card.
September 12, 2007 at 02:42
Hi Adino, I also have dell inspirion 5100 and am having trouble with error messages i keep getting. The error messages I keep getting is irql_not_less_or_equal and page_fault_in_nonpaged_area. I was wondering if you had ever recieved those errors and knew how to fix them. I’m not exactly qualified as a computer technician but I was considering trying to clean the fan since I’ve heard that may be the root of the problem.
Adino: From what I know, page faults could be caused by faulty RAM. Perhaps you should give Dell a call.
December 9, 2007 at 23:53
Adino, thanks so very much for putting this information together. When I bought my 5100 four
years ago, I I thought I was being wise by going with the P4 processor rather than a Celeron. Well needless to say we all learn from our past mistakes! I sent mine back to Dell last year to have the heatsink and thermotape replaced (free of charge even though off warranty, see link http://www.dellcommunity.com/supportforums/board/message?board.id=insp_general&message.id=184252&view=by_date_ascending&page=6 ). now a year ;ater I started having troubles again. Using your instructions, I am now back in business!
Thanks again! If you’re ever in Central New York, look me up and I’ll buy you a drink
as a thank you!
Adino: No problem, I’m just so glad I could help. Thanks for your offer, but it’s highly unlikely that I can have the opportunity to visit New York in the near future
January 7, 2008 at 05:20
Thank you so much!! This was exactly what I needed to gather confidence to fix my old laptop. It’s been overheating like mad and I have been quite worried actually. After reading your guide I went to work and guess what I found? I can tell you this, if that thing was found in the tumble dryer, I would be in serious trouble…
Thank you again for bringing my computer back to life!
Adino: No problem Håkan, glad I was able to help In fact, I just re-cleaned my fan yesterday because my laptop was overheating again.
April 1, 2008 at 02:04
ok let me start off by saying thanks. let me tell u all a story. about a year ago this 5100 started to make this crazy fan noise my gf was like what the hell. thought it was the same problem her brother had with his 5100. so after reading a bit on the world wide web i found this page. about 4 months i replaced the keyboard on the unit but never went and looked for the reason about the noise. well last night i got a new 120 gig western digital hd for free for this laptop so i decided to look around some more on the world wide web. well i came to this page and saw this about the fan i opened the unit up again its simple if you have taken the keyboard out of it before and for $20 bucks for a new keyboard this pc rocks. i found that little fan you where showing in the pic and opened it up grabed some qtips and found a bunch of junk in there. hair / dust balls i cleaned it all out and then threw the fan back on. WOW is all i have to say the pc is now running about 16 hours and is running AOK.
2ND thing i need to tell u about.
my bios on this computer was at A06 <— this is really old i went to DELL.com and found there is a A32 BIOS well guess what when i went to run it it told me the unit was UNSUPPORTED. LOL i looked at the model again and was like this is it LOL i found some page with the DELL A22 so i burned that and bam the BIOS got updated to A22 next i tried the A32 BIOS and BAM it worked.
^^^ THIS HELPED ASWELL IT HAS A FAN CONTROL IDLE BLAH BLAH IN IT SO I WOULD TELL ALL TO UPDATE IF U HAVE NOT ^^^
thanks again to the person that threw this up it helped and should help all that have a 5100. you should do this step atleast once each 6 months i would say to keep your system running smooth like the wind.
**** KEEP ALL THE SCREWS SOME WHERE SO YOU DONT LOOSE THEM **** LIKE A STRIP OF TAPE THIS IS SO THEY DONT DROP SOMEWHERE AND CANT BE FOUND AGAIN ****
Adino: Thanks for the tip to update the BIOS, and glad I was able to help!
August 4, 2008 at 17:55
I need to fix the power jack on my inspiron 5100. What is the best site to help me do this myself. Thanks.
Adino: Sorry I can’t help you there. Perhaps you can do a search on Google or post it in the Dell support forums.
August 6, 2008 at 06:37
Adino,
I have no idea who you are or what you do. But thank you!
I gave up on my Dell 5100. You’ve brought it back to life.
I pulled it out after finding your site, followed your instructions and pulled out something that looked like a dead cat from my laptop.
Now she’s running smooth - and I think I’ll bring her out more often from time to time.
Thanks Adino!
Great job explaining this, photos, text - perfect!! You’re going places … if you’re not there already.
Cheers,
Mik
Adino: You’re welcome… thanks for leaving a comment!
October 10, 2008 at 05:14
Hey Adino,
Thank you so much for taking the time to post this. you REALLY helped me a lot with my 5150.
Adino: You’re welcome Nick
October 17, 2008 at 05:21
you have fixed one of the 2 problems i have with my one and only love. I’ve been using it for years and just recently started cracking it open to fix various problems (keyboard, monitor..etc…)
heck, keeping a 5100 alive should be a nationally reconized hobby!
thanks for your help!
Adino: You’re welcome Fritz!
November 19, 2008 at 20:21
This worked. The entire back vent was blocked and even though she was trying so hard to cool, it just wasn’t happening.
After finishing and testing the difference in airflow is amazing and that loud fan is a thing of the past.
Thanks for taking time to compile this. You’ve added lots more time to the life of my Inspiron.
Adino: You extracted a great carpet of dust didn’t you? Glad I could help John!
November 30, 2008 at 12:14
Thanks for putting this up. I have found this process works better if the entire cooling assembly is removed. To do this you unplug the fan from the motherboard, undo the four screws on top of the cooler and pull it out. Removing the whole unit will allow you to clean all the built up dust out of the cooling fins with compressed air. And definitely coat the top of the cpu with some thermal paste (can get at Radio Shack) before you reinstall the cooler.
Adino: Thanks for the suggestion
December 28, 2008 at 00:56
just want to say thanks for the nice tutorial on cleaning
my dell was just a second-hand unit and they said it was three years old so i probably need to clean it, even though i live in a cold place, it still can be a little hot at the bottom (or maybe im choking the fan since i placed it on top of the fluffy bed XD)
ty again, ill start cleaning tomorow
Adino: You’re welcome!
December 28, 2008 at 14:22
post2
yup, i just cleaned the fan and there was a huge lump of dirt in the grill thinggy
thanks again!
Adino: You need to clean it quite frequently, about once every six months I think.
January 25, 2009 at 00:37
Adino : hey i’m back its now 09 well seemed the unit did the same thing started to get loud and was getting hot so i did the same thing that i did last time but this time i took the whole fan/heatsink off next to the fan is 4 screws that have springs on them those are what u need to take off.
1.) unscrew the 4 screws that hold the fan/heatsink down to the cpu
2.) cleaned out unit u can now clean most of the bottom and all of the heatsink with out sticking qtips in there
3.) i checked the cpu and cleaned all the crapo that was left from the paste that was on there from years and years ago. this is a good step make sure it looks all shiny
4.) also on the back side of the heatsink u should clean all the crapo off that aswell
5.) re apply new termal paste <— this is key when i just opened the unit now the paste was all gone seemed it might have been gone for a bit now.
Arctic Silver 5 is what i re apply on the cpu
what u need to do with this is just apply a thin line one 1 side of the cpu after that u take a index card and smooth it out from side to side make sure its not to much and not to little u just need a thin line.
after doing both the computer now runs even smoother then before. so if you still have your 5100 kicking i would open it up and re apply the paste on the cpu ASAP and clean out the fan trap lol
Adino - thanks again for the great guide hope all that read this check the comments left to see extra stuff that was learned maybe u can add that to your page like a extra tip if needed to clean and re apply paste to cpu if needed
Adino: Wow, thanks for the instructions for cleaning the heatsink and reapplying thermal paste. I think what you did will work even better!
March 30, 2009 at 19:35
Wow, exactly the info I wanted. Thanks a ton! Let’s see how long we can keep our 5100s on the road!
Adino: You’re welcome, glad I could help!
May 9, 2009 at 00:21
my dell 5150 is nearly 6 yrs old, still running. had the motherboard replaced through dell few years ago. Do you know if this cleaning of the fans you posted will work on the Dell 5150?
Adino: I’m not sure… if the casing design is similar then I guess it would work
August 8, 2009 at 23:18
Thanks Adino,
It is really a very helpful post. I had this problem and your step to step guide with photo’s was very useful.
Thanks again for a very useful post.
Anand.
Adino: No problem Anand, glad to help.
November 11, 2009 at 14:54
Nice post bro… you solved my problem.
thanks alot.
Adino: You’re welcome, Erick!
January 3, 2010 at 18:50
Adino, thank you!
At the start of cleaning of my notebook Dell 5100 I’ve could not open it because blue panel did not to want to be removed. But I try to pull it to myself (direction to keyboard) and blue panel has been taken off!!!
Also, I pull out thermal block with CPU and radiator. I think, that CPU is glued to thermal block I cleaned radiator and fan. I want next cleaning to clean space between plates of radiator by velour paper.
Thermal grease I have not replaced because I aware to break the CPU.
Thank you!!!
Adino: Wow, I didn’t dare to remove the thermal block. Thanks for sharing your experience!
January 6, 2010 at 03:34
Some interesting pics of Dell Inspiron 5100 for its cleaning and upgrating:
http://support.dell.com/support/edocs/systems/ins5100/en/sm/index.htm
Adino: Thanks for the link Dimon! It’s an excellent reference for those of you who want to go deeper into the bowels of the Inspiron 5100.
January 15, 2010 at 23:29
Thank you very much for all the detail. My girlfriend was working with an ice pack under her laptop so it wouldn’t shut down. It no longer overheats.
Adino: Glad to help Kevin!
February 24, 2010 at 11:56
Hey Adino, I just bought a 5100 on ebay and knew I should scan the web for issues, and that brought me to your 3 yr. old blog, still helping Dell owners, and gathering more tips along the way. Very cool. I now have the fan cleaned, but would still like to see pics of the thermal paste applied to CPU before I attempt it.
Thanks anyway
Adino: Sorry I can’t provide any photos, but I’m sure there are other sites that have step-by-step instructions for applying thermal paste.
March 14, 2010 at 18:38
thank you - great walk through just cleaning my dell now, really hopeful that it works better now. thank you
Adino: It should work better

April 23, 2010 at 05:46
Thanks for the site, Adino! I too had the loud fan on an old Dell Inspiron 5100. After reading this blog I was excited to clean the machine. Cleaning was easier than I expected. Except … I put it back together again and now the monitor is blank. I pluged an external monitor into the back of the Dell, and that too showed blank. Anyone have any tips? I don’t know if it’s stuck in some kind of sleep mode or what. If (when) I figure it out, I’ll post here to help any one else suffering the same fate. Thanks!
Adino: Oh no… could you have accidentally damaged a cable or something?
April 23, 2010 at 06:22
(cont’d)
Oh boy. So, to recap: I did everything as outlined above, even removed the heat-sink unit (aka: microprocessor thermal-cooling assembly http://bit.ly/adnO56). I removed a wad of dust the size of my finger and reassembled everything.
I had unplugged the computer, but I had not *removed the battery* from the computer.
Question: Did anyone else remove the heat-sink unit w/out having removed their battery? If so, and if it did not result in the destruction of your computer, I’d love to hear it. Otherwise, if everyone else removed their battery and I didn’t, then I guess I have a good idea what’s wrong.
Obviously this is my bad, and I am not blaming Adino or anyone for my gaff. But perhaps, in the Warning Warning Warning section up front on page 1, you could mention this?
The following is a quote I wish I’d read earlier from the Dell Inspiron 5100 documentation site http://bit.ly/ctLJ7R
NOTICE: To avoid damaging the system board, you must remove the main battery before you service the computer.
Still, great site. Thanks for helping everyone!
Adino: I hope you manage to find a solution!
April 23, 2010 at 11:40
Thanks! No hard feelings. Totally my mistake.
Continuing the investigation at http://bit.ly/cghq9d, but I’m out of my depth for trouble-shooting. Thanks for your DIY instructions!
Adino: I’m just glad to help. Btw I’m using a Mac now hehe
April 23, 2010 at 12:17
(Just call me mister posts-a-lot!)
Stop the presses!
PROBLEM SOLVED
First, thank you for your time and consideration!
Second, after reading an article here:
http://danandsherree.com/2005/04/02/our_dell_inspiron_11.php
I found a solution in the comments!!!
AK posted on June 20, 2005 12:02 PM (5 years ago!)
“There is a really easy solution if you loose video after reseating the CPU. [...] there is a small turn screw on the left hand side of where the CPU sits. If you look closely, there are small LOCK and UNLOCK icons on either side of the space where you would turn. After seating the CPU, simply turn the little notch to UNLOCK then back to LOCK, screw your heat sink and fan back in, replace all screws and parts.”
I immediately opened it up, “unlocked” that screw, undid the screws-with-springs, removed / reseated the CPU (it’s attached the bottom side of the screws-with-springs big ol’ case) and “locked” that little screw. I reassembled everything and fired it up. BAM! It worked!!!
Thank You!!!
Adino: Awesome! Thanks for sharing the solution!
May 1, 2011 at 22:18
Thanks, big time it was really stuffed with dirt!! It now runs smoothly…
TYVM, Joris
Adino: No problem Joris!